Monetizing a blog has always been too overwhelming for an average person to figure out. Too many options, platforms and networks. Too many percentages, numbers and terms to qualify.
Whether you are a new or an experienced blogger, it is always that question “Am I doing enough”?
My dream has always been to set up my own independent program without having to rely on any middleman. After all, if we want to own our content, why wouldn’t we want to own its monetization? I would be willing to select who I advertise and how as well as how much I want to charge.
But how to report to advertisers? What kind of click-through to promise them? How to sell your own ads and own the reports and click fraud protection?
This question had been haunting me for ages until I came across Finteza, the free web analytics platform that has “Marketing Campaigns” feature that looked like it was going to solve all my problems.
Finteza allows you to create advertising spaces on your site which will serve your created banners based on your created schedule.
How To Set Up a Campaign
1. Add Finteza Tracking Code
The first step would be adding Finteza analytics to your site which works exactly the same for any analytics suite you are installing: You just need to grab your unique tracking code and paste it to your site the way it appears on all pages.
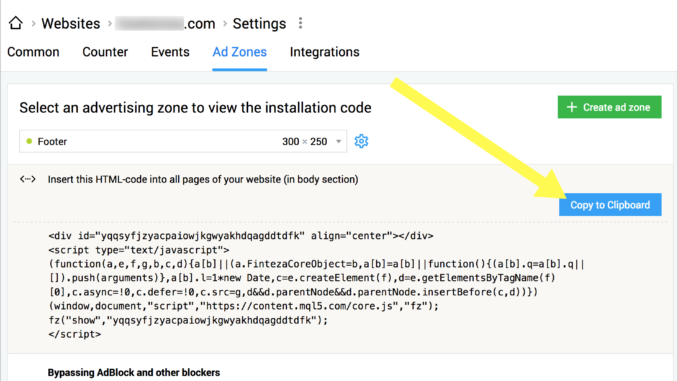
2. Create Your Ad Zones
Ad zones are actual spots on your site where your ads will be served.
To add a new zones, go Websites – Settings -> Ad Zones and click “Create Ad Zone”.
Give your ad zone some recognizable name (e.g. footer, right sidebar, etc.) and select “Use banner width” and “Use banner height” for its dimensions.
You’ll be given a code to install exactly where you want the ad to appear. I simply used WordPress widgets to put the code and then dragged the widget to where I wanted the ad to be served.
Create as many ad zones as you want / can. You may want to test many ad placements on your site to create your price list and know what to promise to your advertisers.
3. Create Your Campaign
Now, proceed to “Campaigns” tab to set up your campaign:
Next give:
The campaign name (This could be your advertiser or project name you are promoting),
Time period you want it to run. This is very helpful if your advertiser only paid for a certain period of time versus a recurring payment. You can even set up time of the day this ad will be activated (which frankly I am not sure when one may need to do but this option still seems impressive).
User agents (I simply add all available, as a rule)
There are also some advanced settings which I find very nice to have (especially if you run your own project ads and want to serve to a certain type of audience):
Now you will need to select the ad zones to serve the ads in. Again, for testing purposes select as many zones as you have: You will be able to use Finteza’s analytics to compare how your zones perform.
Mind that if you add several websites to your Finteza account, you’ll be able to manage multiple campaigns across multiple sites of yours from one location which is very neat.
4. Create Your Banners
Next you will be able to create your “Advertising group”, i.e. specify your target link and add your banners.
Creating banners is a fun process: You upload your creative, add your promo message and select your CTA. The resulting banner will be generated and it will fit all kinds of dimensions and screens. This is done for responsiveness: These auto-generated banners will scale depending on the size of the screen and still look nice.
You can edit your banners later at any point if you choose so.
Again, there will be performance stats available for all your existing creatives, so the earlier you start the more data you will collect, in terms what seems to engage your audience better.
Once you follow all the steps, simply activate your campaign from “Campaigns” tab and you are done! If you scheduled your campaign to start immediately, it will run right away. Simply open your site and double check everything looks ok.
Collect the Performance Stats
Now, before you have willing advertisers to invest in your site, do run your own campaigns. This will allow you to collect all sorts of data on best ad placement, demographics of your audience, your click-through, etc. This will make your call for advertisers much more effective.
Once your advertising campaigns start running, you will be able to collect all sorts of data including:
Your audience demographics
Articles from where ads were clicked from to
Your ad engagement based on the traffic source
Your click-through depending on the ad location and CTA
All the reports are real-time, you can see current performance stats on any of your campaigns the moment you set them up.
Again the tool is free, so there’s nothing really preventing you from giving it a try.
The post How I Created My Own On-Site Advertising Program with Finteza appeared first on SEO Chat.
Source: SEO Chat
Link: How I Created My Own On-Site Advertising Program with Finteza

Leave a Reply